Are you ready to harness the power of n8n automation without the complexity of Docker? You’re in the right place! This comprehensive guide will walk you through the n8n installation process using Node.js, making it simple for both Windows PC and Mac users to get started with this powerful workflow automation tool.
What is n8n and Why Install Without Docker?
n8n (pronounced “n-eight-n”) is an open-source workflow automation tool that lets you connect different apps, services, and APIs to create powerful automated workflows. Think of it as your personal automation assistant that runs directly on your computer!
Why Choose the Non-Docker Method?
Before diving into the installation process, let’s understand why you might want to install n8n without Docker:
Advantages of Installing n8n Without Docker:
- Lighter resource usage – Your computer won’t need to run a separate containerization platform
- Direct system access – n8n runs natively on your machine with full hardware access
- Simpler setup – No need to learn Docker commands or container management
- Better performance – Especially beneficial if you want to utilize GPU acceleration
- Easier troubleshooting – Direct access to logs and configuration files
- Lower barrier to entry – Perfect for beginners who aren’t familiar with containerization
Key Differences: Docker vs Non-Docker Installation
| Aspect | With Docker | Without Docker (Native) |
|---|---|---|
| Setup Complexity | Moderate (requires Docker knowledge) | Simple (just Node.js) |
| Resource Usage | Higher (container overhead) | Lower (native execution) |
| Updates | Container-based (easier isolation) | Manual npm updates |
| System Integration | Isolated environment | Direct system access |
| Best For | Production, multiple instances | Development, learning, lightweight setups |
🎨 IMAGE PROMPT #2: Description: Create an infographic-style comparison chart showing Docker (with container icon) on one side and Node.js (with the Node.js hexagon logo) on the other, with checkmarks and icons representing the differences in resource usage, complexity, and performance. Alt Text: “Comparison between Docker and native Node.js installation for n8n”
Prerequisites: What You’ll Need
Before starting your n8n installation, make sure you have:
- A computer running Windows 10/11 or macOS (10.15 or later)
- Administrator/root access to your system
- At least 4GB of RAM (8GB recommended)
- Stable internet connection
- About 15-20 minutes of your time
Important Note: n8n currently supports Node.js versions 18.x, 20.x, and 22.x. We’ll be installing a compatible version in the next steps.
Step 1: Installing Node.js (The Foundation)
Node.js is the runtime environment that n8n needs to operate. Here’s how to install it on both Windows and Mac:
For Windows Users:
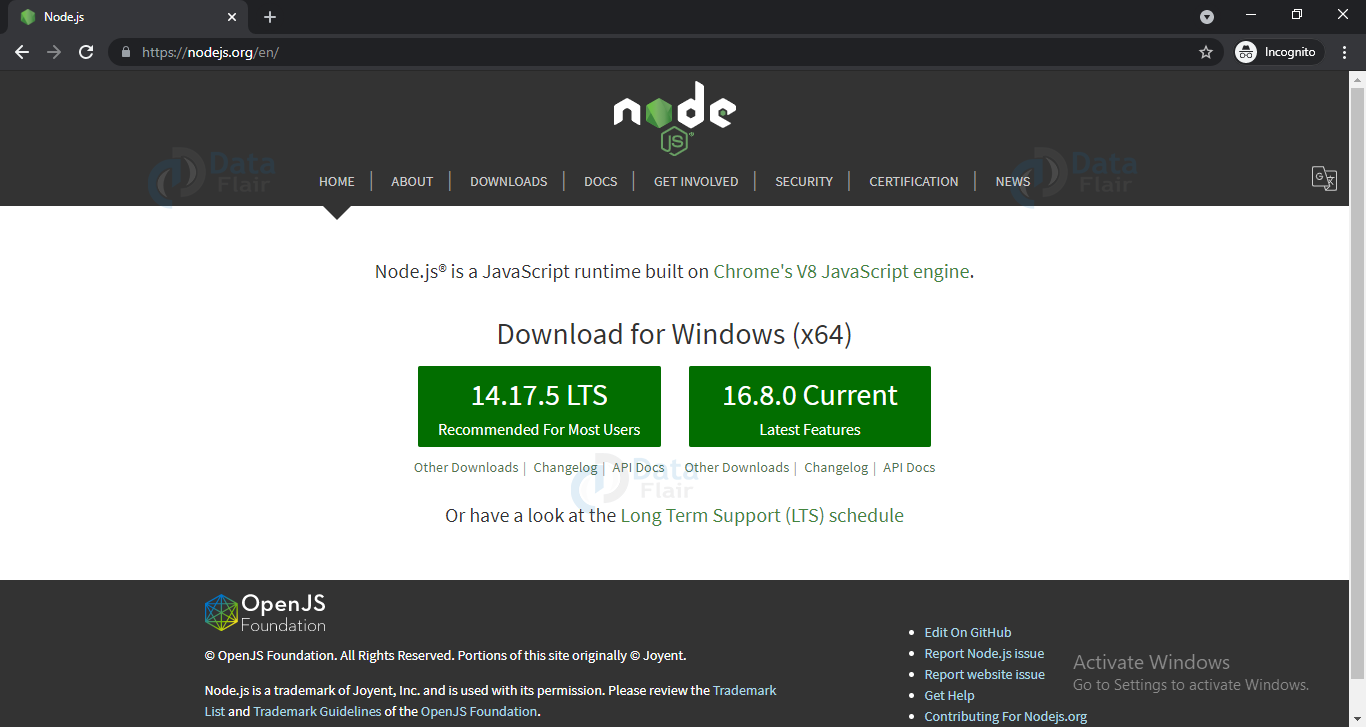
- Visit the Node.js Website
- Open your browser and go to https://nodejs.org/
- You’ll see two download options: LTS (Long Term Support) and Current
- Download the LTS Version
- Click on the LTS version (recommended for most users)
- This ensures stability and compatibility with n8n
- The file will be named something like
node-v20.x.x-x64.msi
- Run the Installer
- Locate the downloaded file (usually in your Downloads folder)
- Double-click to run the installer
- Click “Next” through the setup wizard
- Important: Make sure “Automatically install necessary tools” is checked
- Accept the license agreement
- Choose the default installation path (recommended)
- Verify the Installation
- Open Command Prompt (search for “cmd” in the Start menu)
- Type the following command and press Enter:
node -v- You should see something like
v20.11.0(your version number may differ) - Now check npm (Node Package Manager):
npm -v- You should see a version number like
10.2.4

For Mac Users:
- Visit the Node.js Website
- Navigate to https://nodejs.org/
- Download the LTS version for macOS
- Install Node.js
- Open the downloaded
.pkgfile - Follow the installation wizard
- You may need to enter your Mac password to authorize the installation
- Open the downloaded
- Verify the Installation
- Open Terminal (press Cmd + Space, type “Terminal”, and press Enter)
- Check Node.js version:
node -v- Check npm version:
npm -v
Alternative Method for Mac Users (Using NVM – Recommended for Developers):
If you want more control over Node.js versions, consider using NVM (Node Version Manager):
# Install NVM
curl -o- https://raw.githubusercontent.com/nvm-sh/nvm/v0.39.0/install.sh | bash

# Close and reopen Terminal, then install Node.js
nvm install 20
nvm use 20
Step 2: Installing n8n Using npm
Now comes the exciting part – installing n8n itself! There are two methods you can choose from:
Method A: Quick Start with npx (No Installation Required)
This method is perfect if you want to try n8n without permanently installing it:
For Both Windows and Mac:
- Open Your Terminal/Command Prompt
- Windows: Open Command Prompt or PowerShell
- Mac: Open Terminal
- Run n8n Directly
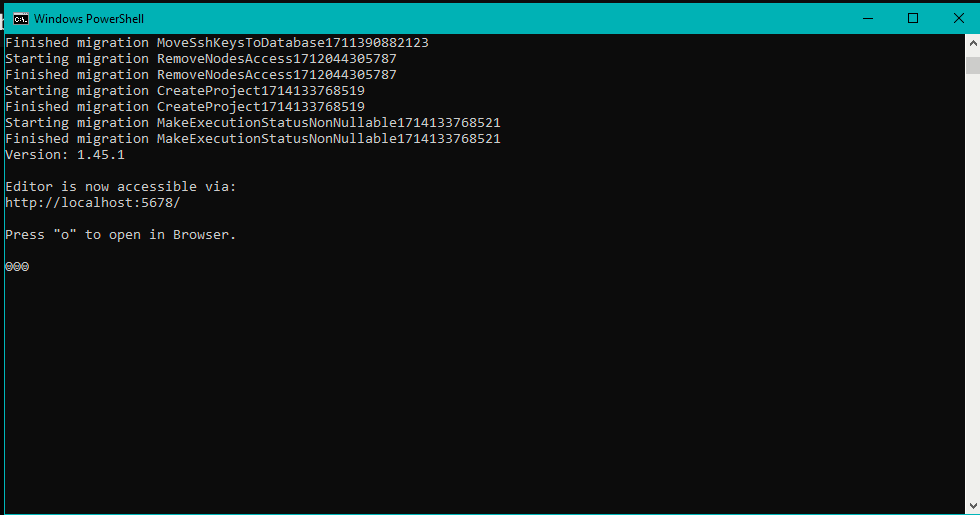
npx n8n - Wait for the Magic
- The first time you run this, it will download n8n
- You’ll see messages indicating the download and initialization
- Look for a message saying “Editor is now accessible via: http://localhost:5678”
Pros of npx method:
- No permanent installation
- Always runs the latest version
- Great for testing
- Easy to get started
Cons:
- Slightly slower startup (downloads each time if not cached)
- Not ideal for regular daily use
Method B: Global Installation (Recommended for Regular Use)
If you plan to use n8n regularly, installing it globally is the better option:
For Windows Users:
- Open Command Prompt as Administrator
- Search for “cmd” in Start menu
- Right-click “Command Prompt”
- Select “Run as administrator”
- Install n8n Globally
npm install -g n8n - Wait for Installation
- This may take a few minutes
- You’ll see progress bars and installation messages
- Don’t close the window until you see “added X packages” message
- Start n8n
n8n
For Mac Users:
- Open Terminal
- Install n8n Globally If you encounter permission errors, use one of these methods: Option 1: Using sudo (simpler but requires password)
sudo npm install -g n8nEnter your Mac password when prompted. Option 2: Configure npm for global installs without sudo (recommended)mkdir -p ~/.npm-global npm config set prefix '~/.npm-global' echo 'export PATH=$HOME/.npm-global/bin:$PATH' >> ~/.zshrc source ~/.zshrc npm install -g n8n - Launch n8n
n8n

Step 3: Accessing n8n for the First Time
Congratulations! n8n is now running on your computer. Here’s what to do next:
- Open Your Web Browser
- Use any modern browser (Chrome, Firefox, Safari, Edge)
- Type this address in the URL bar:
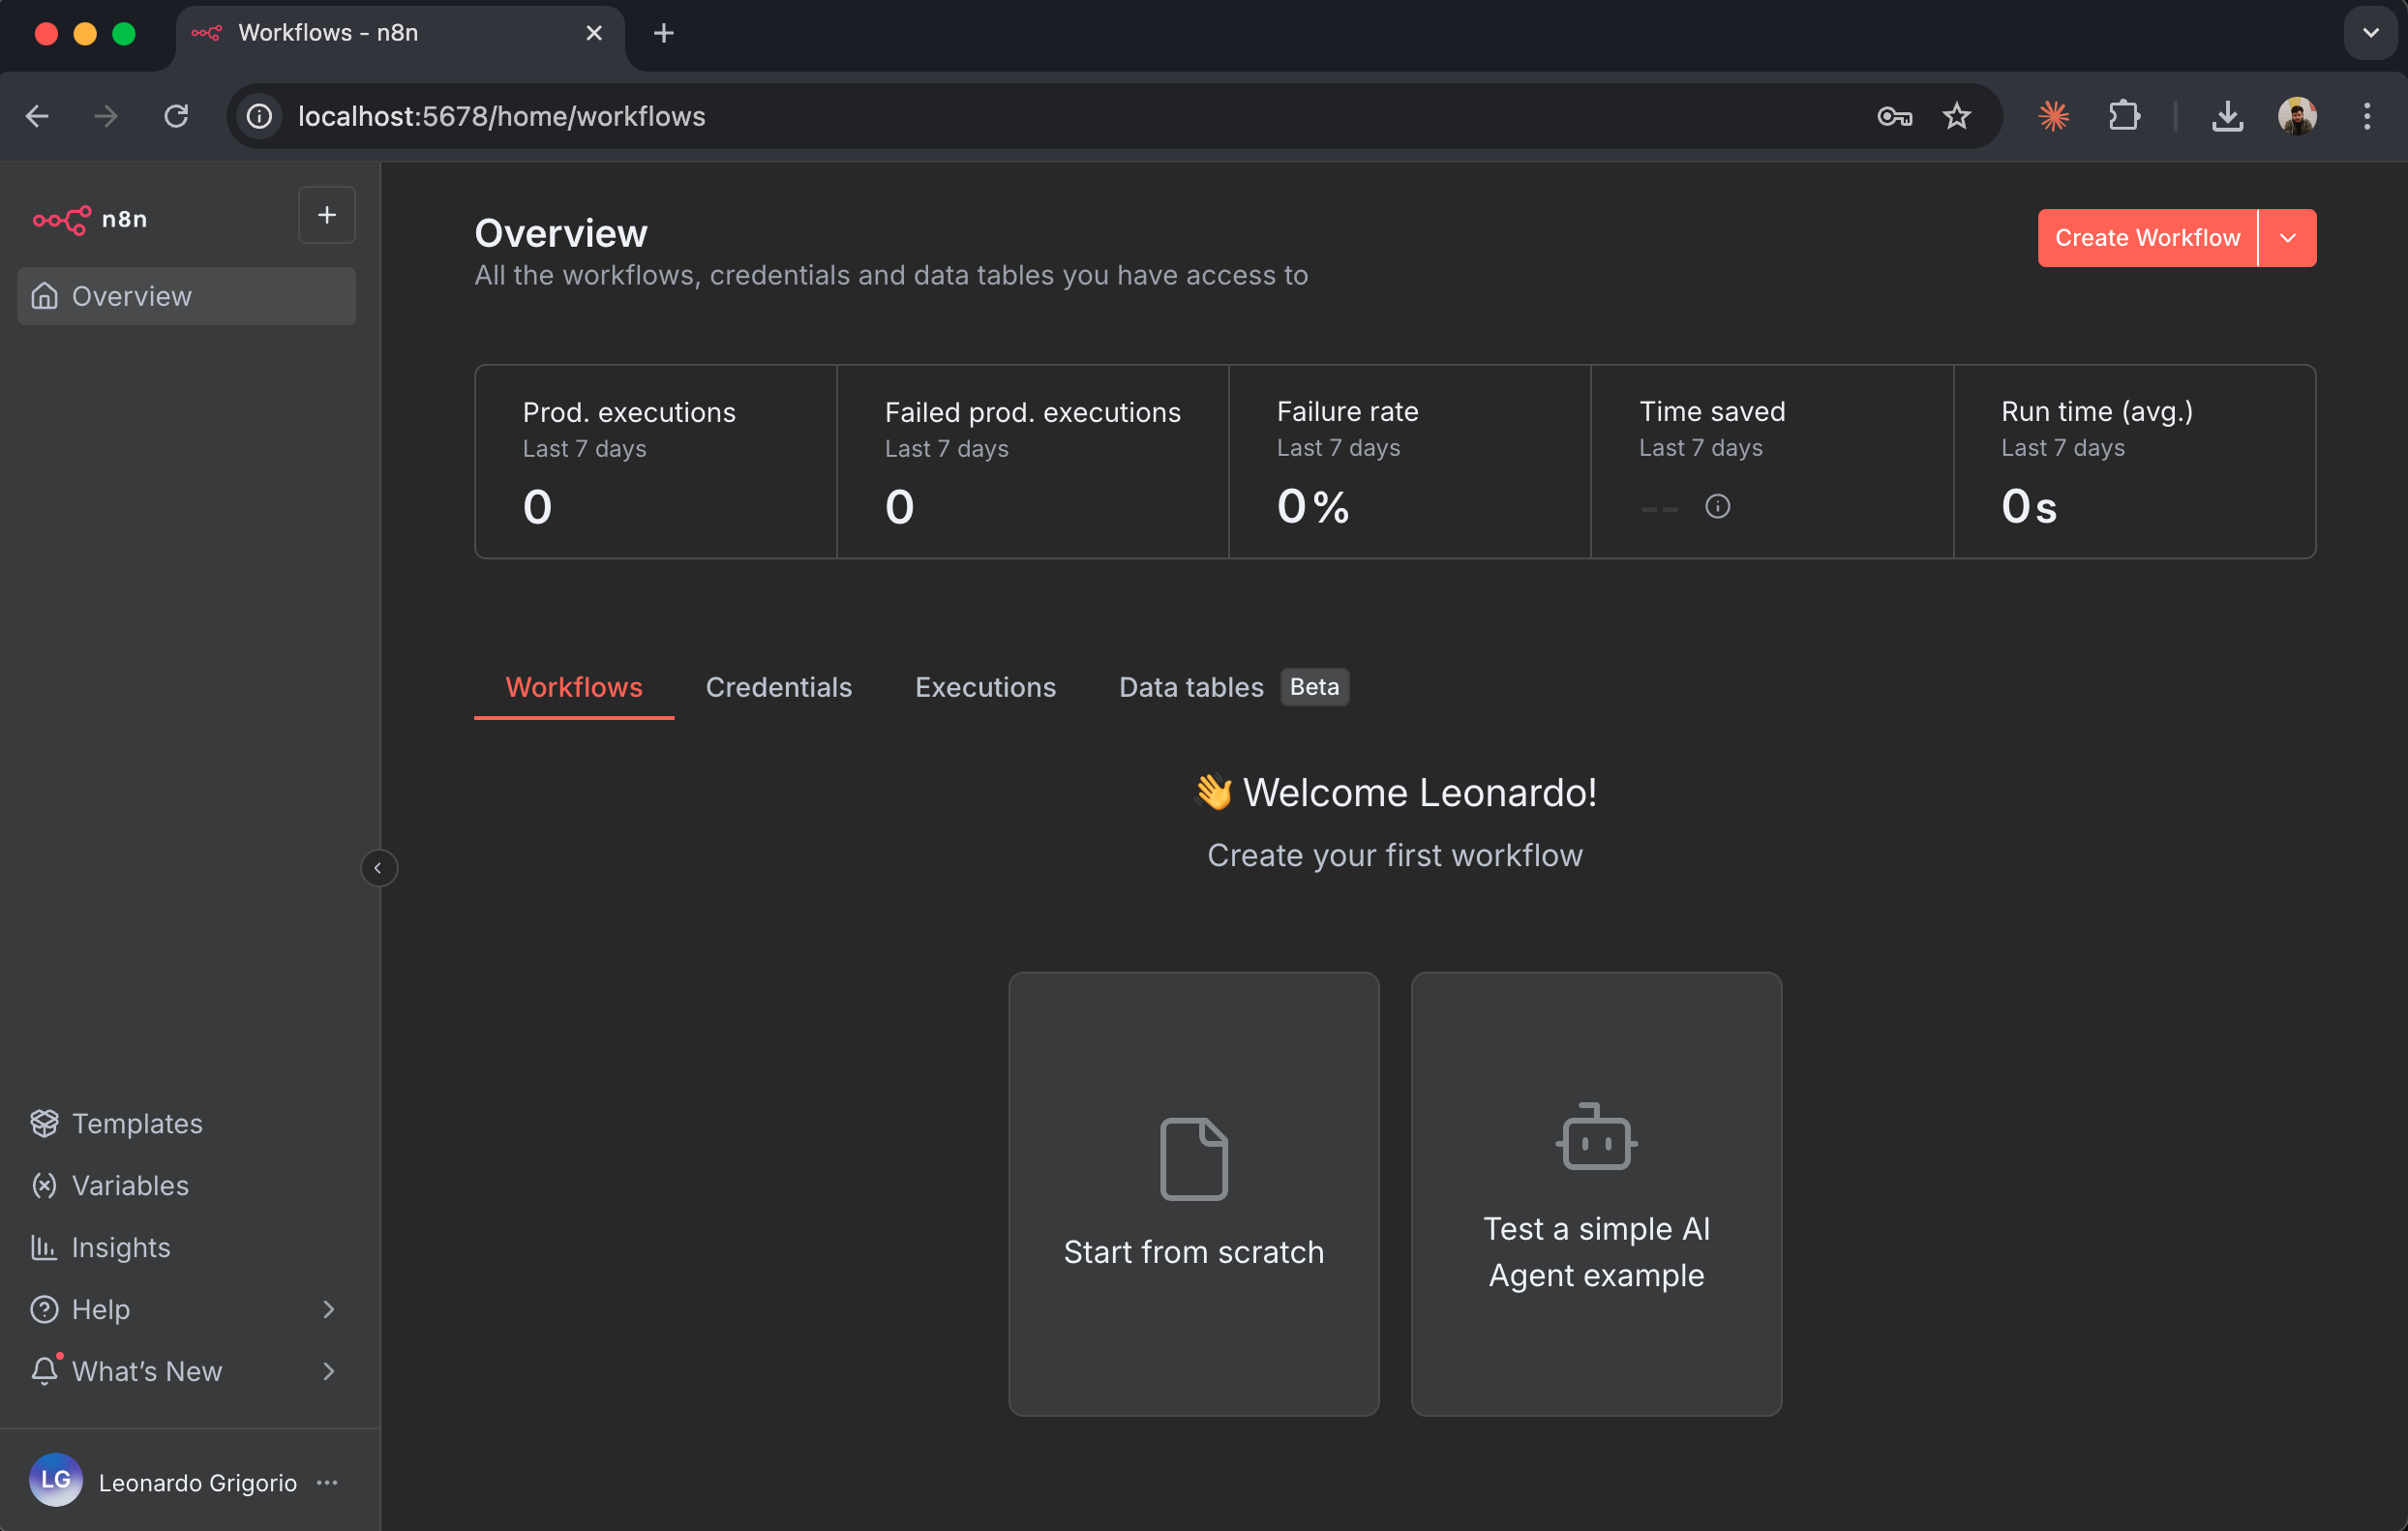
http://localhost:5678 - You’ll See the Welcome Screen
- The first time you access n8n, you’ll be greeted with a clean, modern interface
- Don’t worry – your terminal window should still be running in the background
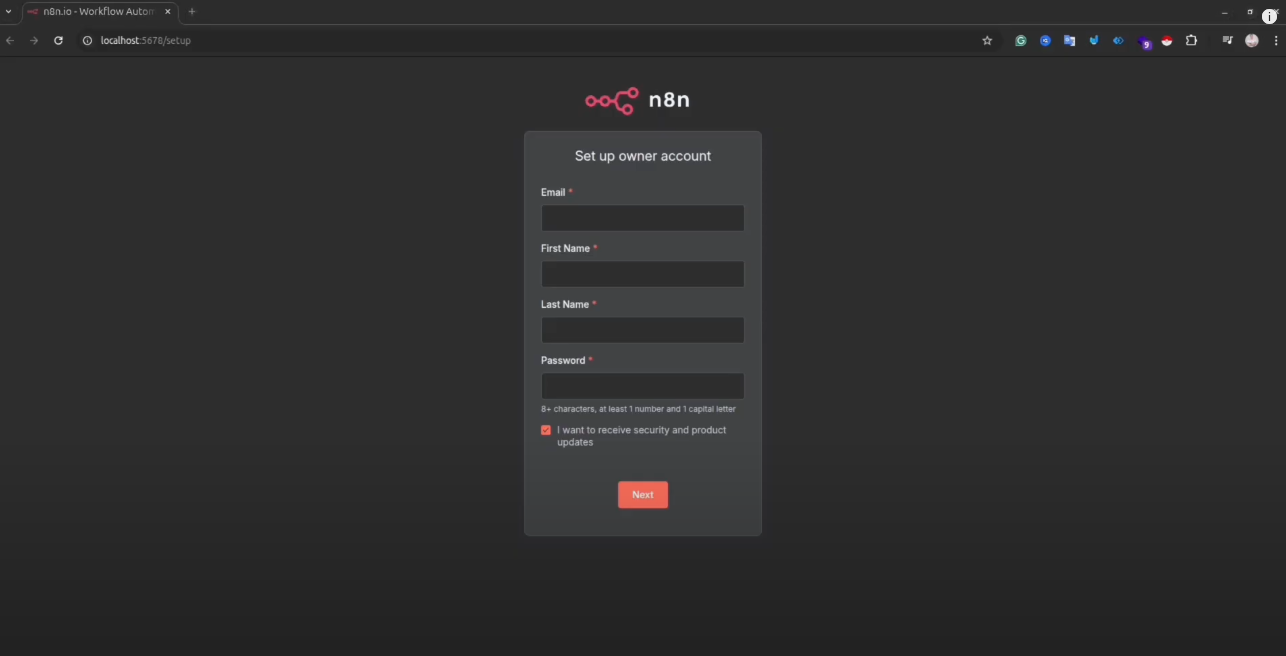
Step 4: Creating Your Owner Account
Security first! n8n requires you to set up an owner account:
- Fill in Your Details
- Email: Enter a valid email address (you’ll use this to log in)
- First Name: Your first name
- Last Name: Your last name
- Password: Choose a strong password (at least 8 characters)
- Important Security Notes:
- Even though n8n is running locally, always use a strong password
- Write down your credentials in a secure password manager
- You’ll need these credentials every time you restart n8n
- Click “Create Account”
- You’ll be instantly logged in
- Welcome to your n8n dashboard!
Step 5: Exploring Your First Workflow
Now you’re ready to create your first automation workflow!
- You’ll See the Workflow Canvas
- A blank canvas with a plus (+) button in the center
- This is where you’ll build your automation magic
- Understanding the Interface
- Left Sidebar: Contains all available nodes (integrations)
- Center Canvas: Where you drag and connect nodes
- Top Menu: Save, execute, and manage workflows
- Right Panel: Node settings and configuration
- Creating Your First Simple Workflow
- Click the “+” button on the canvas
- You’ll see categories like “Trigger,” “Action,” “Flow,” etc.
- Try adding a “Schedule Trigger” to run tasks automatically
- Then add an action node like “HTTP Request” to fetch data

Essential Safety Rules and Backup Strategies
Now that you have n8n running, let’s talk about keeping your data safe. This is crucial because your workflows and credentials are valuable!
Understanding Where n8n Stores Your Data
Windows:
C:\Users\YourUsername\.n8n
Mac/Linux:
~/.n8n
This folder contains:
- All your workflows
- Saved credentials
- Execution history
- Configuration files
Backup Best Practices
1. Manual Backup (Recommended Weekly)
For Windows Users:
# Open Command Prompt and run:
xcopy "%USERPROFILE%\.n8n" "C:\Backups\n8n-backup-%date:~-4,4%%date:~-10,2%%date:~-7,2%" /E /I /H /Y
For Mac Users:
# Open Terminal and run:
cp -R ~/.n8n ~/Documents/n8n-backup-$(date +%Y%m%d)
2. Automated Backup Script
For Windows – Create a .bat file:
@echo off
set BACKUP_DIR=C:\Backups\n8n
set TIMESTAMP=%date:~-4,4%%date:~-10,2%%date:~-7,2%_%time:~0,2%%time:~3,2%
xcopy "%USERPROFILE%\.n8n" "%BACKUP_DIR%\backup-%TIMESTAMP%" /E /I /H /Y
echo Backup completed successfully!
pause
For Mac – Create a backup.sh script:
#!/bin/bash
BACKUP_DIR=~/Documents/n8n-backups
TIMESTAMP=$(date +%Y%m%d_%H%M%S)
mkdir -p "$BACKUP_DIR"
cp -R ~/.n8n "$BACKUP_DIR/n8n-backup-$TIMESTAMP"
echo "Backup completed successfully!"
3. Cloud Backup Integration
Consider syncing your backup folder with:
- Google Drive
- Dropbox
- OneDrive
- iCloud (for Mac users)
Safety Checklist:
- ✅ Backup before updating n8n
- ✅ Backup before making major workflow changes
- ✅ Test your backups occasionally by restoring to a different folder
- ✅ Keep at least 3 backup copies (current, last week, last month)
- ✅ Store one backup copy in a different physical location or cloud
Customizing Your n8n Installation
Changing the Default Port
If port 5678 is already in use or you want to use a different port:
Windows (Command Prompt):
set N8N_PORT=5680
n8n
Windows (PowerShell):
$env:N8N_PORT=5680
n8n
Mac/Linux:
export N8N_PORT=5680
n8n
Making Port Changes Permanent
For Windows:
- Search for “Environment Variables” in Start menu
- Click “Edit the system environment variables”
- Click “Environment Variables” button
- Under “User variables,” click “New”
- Variable name:
N8N_PORT - Variable value:
5680(or your preferred port) - Click OK and restart your terminal
For Mac:
- Open Terminal
- Edit your shell configuration:
nano ~/.zshrc - Add this line:
export N8N_PORT=5680 - Press Ctrl+X, then Y, then Enter to save
- Restart Terminal or run:
source ~/.zshrc
Running n8n in the Background
For Windows – Using Task Scheduler:
- Open Task Scheduler
- Create a new task
- Set trigger: “At startup” or “At log on”
- Set action: Start program
cmd.exe - Arguments:
/c n8n - Configure to run whether user is logged in or not
For Mac – Using Launch Agent: Create a file at ~/Library/LaunchAgents/com.n8n.plist:
<?xml version="1.0" encoding="UTF-8"?>
<!DOCTYPE plist PUBLIC "-//Apple//DTD PLIST 1.0//EN" "http://www.apple.com/DTDs/PropertyList-1.0.dtd">
<plist version="1.0">
<dict>
    <key>Label</key>
    <string>com.n8n</string>
    <key>ProgramArguments</key>
    <array>
        <string>/usr/local/bin/n8n</string>
    </array>
    <key>RunAtLoad</key>
    <true/>
    <key>KeepAlive</key>
    <true/>
</dict>
</plist>
Then load it:
launchctl load ~/Library/LaunchAgents/com.n8n.plist
Troubleshooting Common Issues
Problem 1: “Port 5678 Already in Use”
Solution:
- Check if n8n is already running in another terminal window
- Use the port change method described above
- Find and stop the process using that port:
Windows:
netstat -ano | findstr :5678
taskkill /PID <process_id> /F
Mac:
lsof -ti:5678 | xargs kill -9
Problem 2: “Command ‘n8n’ Not Found”
Solutions:
Windows:
- Restart your terminal/command prompt
- Verify npm installation:
npm -v - Reinstall n8n:
npm install -g n8n - Check if npm global directory is in PATH
Mac:
- Restart Terminal
- Ensure global npm directory is in PATH:
echo $PATH - If needed, add it to your .zshrc as shown in the installation section
Problem 3: Permission Errors on Mac
Solution: Use the npm configuration method (without sudo):
mkdir -p ~/.npm-global
npm config set prefix '~/.npm-global'
echo 'export PATH=$HOME/.npm-global/bin:$PATH' >> ~/.zshrc
source ~/.zshrc
npm install -g n8n
Problem 4: n8n Crashes or Freezes
Solutions:
- Check your system resources (RAM, CPU)
- Close unnecessary applications
- Update Node.js to the latest LTS version
- Clear npm cache:
npm cache clean --force - Reinstall n8n
🎨 IMAGE PROMPT #14: Description: Troubleshooting flowchart showing common n8n installation problems on the left and their solutions on the right, with arrows connecting them. Use icons for each issue type. Alt Text: “Common n8n installation issues and troubleshooting solutions”
Updating n8n
Keeping n8n updated ensures you have the latest features and security patches:
Before Updating – Critical Steps:
- Stop n8n (Press Ctrl+C in the terminal where it’s running)
- Backup your data folder (see backup section above)
- Note your current version:
n8n --version
Updating n8n:
If installed globally:
npm update -g n8n
If using npx:
- npx always downloads the latest version, so no update needed!
- Clear cache for a fresh download:
npm cache clean --force
After Updating:
- Start n8n:
n8n - Access http://localhost:5678
- Verify your workflows still work correctly
- Check the changelog at n8n GitHub releases
Performance Optimization Tips
1. Increase Node.js Memory Limit
For complex workflows with large datasets:
Windows:
set NODE_OPTIONS=--max-old-space-size=4096
n8n
Mac:
export NODE_OPTIONS=--max-old-space-size=4096
n8n
2. Enable Execution Data Pruning
Add to your environment variables:
N8N_EXECUTIONS_DATA_MAX_AGE=168  # Keep execution data for 7 days
N8N_EXECUTIONS_DATA_PRUNE=true
3. Monitor Resource Usage
Windows:
- Open Task Manager (Ctrl+Shift+Esc)
- Look for “node.exe” process
- Monitor CPU and Memory usage
Mac:
- Open Activity Monitor (Cmd+Space, type “Activity Monitor”)
- Search for “node”
- Monitor CPU and Memory tabs
Key Takeaways: Docker vs Non-Docker Installation
Let’s summarize the key differences we’ve discussed:
Choose Non-Docker Installation When:
- You’re learning n8n and want a simple setup
- You need lightweight resource usage
- You want direct access to system resources
- You prefer simpler troubleshooting
- You’re running on a personal computer for development
Choose Docker Installation When:
- You’re deploying to production
- You need multiple isolated instances
- You want easier updates and rollbacks
- You’re comfortable with container management
- You need guaranteed environment consistency
Both Methods Are Perfectly Valid! The best choice depends on your specific needs, technical comfort level, and use case.
Next Steps: Building Your First Real Workflow
Now that you have n8n installed and running, here are some beginner-friendly workflow ideas:
- Email Automation
- Set up a workflow to check your Gmail and save attachments to Google Drive
- Create auto-responses based on email content
- Social Media Management
- Post to multiple platforms from a single trigger
- Save mentions and comments to a spreadsheet
- Data Collection
- Scrape websites for price monitoring
- Collect data from APIs and store in databases
- Productivity Automation
- Create tasks in your project management tool from emails
- Sync calendars across different platforms
Helpful Resources
- Official Documentation: https://docs.n8n.io/
- Community Forum: https://community.n8n.io/
- Workflow Templates: https://n8n.io/workflows
- YouTube Tutorials: Search for “n8n tutorials” for video guides
- GitHub Repository: https://github.com/n8n-io/n8n
Conclusion
Congratulations! You’ve successfully completed your n8n installation without Docker and are now ready to start automating your workflows. Remember these key points:
✅ Always backup your data before making changes ✅ Keep Node.js and n8n updated for the best performance ✅ Start simple and gradually build more complex workflows ✅ Join the community for support and inspiration ✅ Document your workflows so you can remember what they do later
The beauty of installing n8n without Docker is that you have complete control over your automation environment. It runs natively on your system, uses fewer resources, and gives you direct access to everything you need.
Whether you’re automating personal tasks, building business workflows, or just exploring what’s possible with automation, n8n is a powerful tool that grows with you. The learning curve might seem steep at first, but with practice, you’ll be creating sophisticated automations in no time!
Happy automating! 🚀